Tuesday, 31 December 2013

Goodbye 2013 - Looking Back

2013 has been a good year.  Things done:

I've 'met' more fellow bloggers trying to fit creativity into real life, whose support and encouragement I am so grateful for...

... managed some, but not enough, quilt-making:

Emerald; Crazy Mini; Quilt in a DayBeach Finds; Tiny Happy Improv Quilt; Siblings Together 3 - Through the Window

(I still have three quilts in progress and am asking myself why I find it so hard to finish them off.  Too little time, too easily distracted - Must Try Harder.)

...got converted to Artist Trading Cards (thanks to Ali)

Artist Trading Cards

...made some Komebukuro bags, and learned to love Liberty and crazy patchwork

Tiny Crazy Patchwork; Komebukuro bag; Music bag 1: Liberty patchwork box; Komebukuro bag; Music bag 2; Komebukuro bag detail; Box with origami lotus lid

...and tried to learn something new with everything I do, which isn't hard when you're a novice in so many areas.  Each time I do I am thankful to someone who took the time to demonstrate a procedure or tip, because writing up tutorials is time-consuming.

Last year's resolutions:
  • Lose the extra half stone put on over the Christmas holidays - FAIL
  • If it's going to take less than two minutes do it right away - BIG WIN  highly recommended.
  • Do one creative thing every day - PARTIAL FAIL.  But I tried, so I think it should count as a PARTIAL WIN.
  • Get fit.  WIN followed by FAIL.  In six months I went from being able to jog lumpenly for one minute at a time to being able to jog lumpenly for two miles.  During the summer school holidays I never seemed to have the time and it all went downhill thereafter. 
The thing I'm most proud of:

Emerald.  I love this quilt which is where I want to go in 2014.  More about that tomorrow.


Friday, 20 December 2013

Laptop is going off until after Christmas!  Thank you for your encouragement and support over the last year - Happy Holidays.


Tuesday, 17 December 2013

Liberty boxes

You know sometimes the more you make the more fired up you get?  I think I'm going through a bit of that at the moment.  It's fun while it lasts!

Anyway, I was looking at the crazy patchwork scrap fabric I showed how to make yesterday and thought how lovely it might look as a box, so I covered a sturdy chocolate box with pink tissue paper, and glued a panel to the top.  I used the same glue (white glue, which dries clear) to 'varnish' the whole box.


Then, as I was having a good time and putting off doing some hoovering I made another little box.  This one uses one of my Liberty origami brooches to decorate the lid and is going to contain a Christmas present.


Then I was quite pleased and had to take lots of pretentious photographs!


Monday, 16 December 2013

How to store and use really tiny scraps, and another way to make crazy patchwork

Over the last few months I have sewn a few projects using Liberty and was left with some very small scraps, none much over an inch at the widest, and some only a cm or so in width, so impossible to seam.


If you are like me and can't bear to throw this kind of thing away one way of using it up is to transform your tub of tangled bits into one piece of fabric which can be used in various projects.  You can do this using a method of crazy patchwork.

It is different to the 'spiral method' I used to make panels for my bags, and uses a foundation cloth, so as well as your scraps you need some cloth for your foundation (eg fine cotton sheeting), some Pellon/ Bondaweb/ WonderUnder, and threads.

Cut a piece of Bondaweb the same size as your foundation fabric, place your Bondaweb on your fabric rough (glue) side down, iron and then remove the backing paper to leave a layer of glue on your foundation fabric.  (Hang on to the backing paper for the moment.)

Now start to lay out your scraps on your foundation fabric, butting them up together or overlapping them just a bit if necessary.  You won't have to worry about seams and you don't have to lay them out in any particular order - you can be quite relaxed about it; it's a bit like crazy paving.  Just don't leave any gaps.


When you have covered your backing fabric with scraps you can use the piece of paper you peeled away (obviously now glueless) to protect your iron from any stray glue round the edges while you bond the scraps to the backing fabric.  I keep these bits of paper in my work tub - they come in handy.


You'll end up with this.


Now go over all the overlapped or butting edges with a small zigzag stitch or blanket stitch or whatever you fancy - again, you can be quite relaxed about it, crossing over pieces and reversing over your own stitching to follow another edge unless you are a perfectionist which I'm generally not.  You might see some lines of stitching below where I have crossed a piece of fabric and then kept going just in order to avoid having to lift the needle to stop and start another line.


Now you have your lovely, scrappy fabric which you can treat like any other.   First of all it is easier to keep in the cupboard without getting in a mess.  Then you can cut selectively from it and use pieces for applique - it is easy to cut as it is stabilised by the backing.  Or you can use larger pieces to make pouches or pincushions.  Of course you can also join panels together for bigger projects.

I used some of mine this week to make a table mat just for me.  It was inspired by Larisa's mats, which in turn were inspired by the Komebukuro bags and pouch I made.  I really like that about blogging!


[If you don't have Bondaweb but happen to have a can of spray baste you can spray your foundation fabric and fix your scraps to it that way - omit the ironing!]


Sunday, 15 December 2013

Festive Slow Blog Linky

Hello all slow bloggers.  Have you been slow or have you been in a sewing frenzy making Christmas presents?

In my case it's the latter and does go to show what could be achieved if I cracked on with it although I don't think I could stand the pace and would very quickly be a wreck with no housework done and little bits of lint stuck to every surface - of me, and the house.

Apart from my Little Robots quilt-in-a-day, and related cushion cover I've managed some more patchwork.  My sneak peak earlier this week was of a doll's quilt for my only niece.  I used a mini charm pack of Simply Style by Vanessa Christensen of V&Co to make it. It was a freebie, and I really like this fabric which makes me realise I should be more adventurous in my buying habits.


I had such fun sewing a fleece blanket complete with blanket stitch, a sheet with embroidered turn-down, a pillow and pillow slip with ribbon detail - obviously I'm not as grown up as I like to think.  I hope she likes it.


If you would like to share your activities this month, creative or otherwise,  do link up, flash the Slow Blog button on your blog or post and make sure to visit other Slow Bloggers to show them some encouragement.  And as always, if you would like to host a Slow Blog linky party, just let me know.

Friday, 13 December 2013

Quilt in a Day

Unusually for me I can actually link up to the wonderful Finish it up Friday because  I do have a finish - in fact two.  Yay!

It can take me ages to make something and blog it, but I rashly said that I would make my littlest nephew a quilt for Christmas and as I have been faffing about for far too long the day came (yesterday) when I really had to get on with it, so apart from cutting the squares the night before, this whole quilt was assembled in the time between school drop off and pick up!


To my surprise this pic was automatically "Awesomed" by Google with a snow animation when I uploaded it - it freaked me out but now I know it's not a virus I quite like it - if it's annoying, let me know and I'll turn it off!

The quilt is obviously very simple - I cut 9 inch squares from fat quarters, and arranged them in a random pattern - and the quilt isn't bound because I thought a binding would have looked too busy.  Instead it's just sewn inside out and turned.


I used two ranges of fabrics - the one I really couldn't resist was Rebekah Ginda's Robotic for Birch fabrics, because one of the robots reminds me of my nephew.  I used a snippet to make a label on the back


and managed to line it up so that the stitching captured the same little robot on the front.


I bought a handful of fat quarters and planned to find some co-ordinating fabrics but then I miraculously discovered that I had forgotten about some Robert Kauffman robots, cogs and circuit boards which had come via my mother-in-law from the Fat Quarterly Retreat.  

The colours were just perfect too - hooray! My stash isn't very big so I don't discover things I have forgotten about in it very often!   Grandpa is spending Christmas with his grandsons and I'm hoping that, as a scientist, he will approve of the wrenches and cogs, circuit boards, beakers and microscopes.


I incompetently doubled up my order of rocket fabric but it turned out to be just right for the back.


Rather than quilt it I decided to tie it using one of the few fancy stitches on my machine - you can see it below.  I sewed these little stars at approximately 4 inch intervals, and although I have yet to see how it holds up to washing I really like the effect which is very soft.


The leftovers made a cushion cover for his brother too, just in case he was envious!


Some of the pieces were too small to make blocks, so I made some blocks of quarter squares.  It is simply echo quilted a quarter inch from the seams and has a simple envelope back in trusty Ikea Nummer fabric.


Two presents ticked off the list - I don't like to think how many more there are to go!

Thursday, 12 December 2013

Wordless WIPs


Well almost wordless.  Maybe that tree needs a tree skirt after all.

Wednesday, 11 December 2013

If you are as busy as me in the run up to Christmas then that is very very busy.  It's madness.  Still I couldn't resist timing this post to appear at 10 o'clock, on the 11th of the 12th month of '13.  I'm sure it must be lucky or something though would have been even better if I had managed 9.10...

So here's just a glimpse of something I have been up to.  More soon.


Saturday, 7 December 2013

Imperfect but finished. Everything is a learning experience, and I'm happy!  Not much time to be making anything else at the moment apart from a seriously bricklike Christmas cake.


Thursday, 28 November 2013

WIPing along

Taking a break from bunting (which I've started dreaming about at night) to do a bit of experimenting.


A gold leaf for a golden wedding.


I thought the one above was too autumnal so perhaps not good psychology...This is my current favourite but I need to practice a bit with finishing and ending the fancy stitch.


I love the backs though.


Tuesday, 26 November 2013

New to Me in November

I'm linking up with Fiona for New To Me this month - I've dropped out of sight a bit for the last couple of weeks because I've been up to a few new things and on a bit of a learning curve as I went along.

First a bit of charm swapping - the Low Volume Charm Swap run by Rachael at the Floral Suitcase.   After a lot of deliberating about what exactly constitutes low volume I got lucky as Sarah did a post on low volume fabrics currently on sale - what a star!  I've got two spots in the swap so I should be receiving 2 bundles of 56 squares.  I'm quite excited about this but I have been putting off cutting up my fabrics out of terror at the hideous responsibility of doing it for other people and the fear of getting marks from my iron on the fabric, or cutting it squint. Now it's done!


I've found recently that when fabric comes off the bolt folded the pattern sometimes seems to banana in the middle, so after ironing my first fabric out flat I had to fold it in half by matching up the selvedges while holding it up to the light so I could make sure that the pattern line ran straight across.

Some stamp making - totally inspired by Fiona's own.


And finally I bet almost everyone who makes stuff has a little nagging voice of self-doubt but I decided to ignore it anyway and try making stuff to sell.  I'm dipping my toe in the shallow end by starting with bunting - and little bags to put it in - and giving it to a friend to sell in her shop.


I've made about 40 metres of it so far - here's hoping.


As well as the bunting, I've been making Liberty fabric brooches using charm squares from Very Berry Fabrics (tutorial here, shortly to be updated).


This is my favourite.


It's turning into really useful experience, partly because I'm realising just how little my hourly "wage" will be after deducting costs, which probably isn't news to anyone who does this for a living.  It's also useful from the point of view of learning about perfectionism and finishing things off properly.

Do you make things to sell?  Where do you sell your work?  And do you have a handy formula for pricing - or do you wing it?

Meanwhile, if you know anyone who would like to buy Christmas bunting, you can point them my way;-)


Friday, 22 November 2013

Slow Blog Linky

This month the Slow Blog linky has become a moveable feast and is being hosted by Willit who has written a great post about life and creativity and blogging.

When I first started blogging it was because I love making things, and I wanted to engage with the community of other people who like doing the same.   We can't always be as productive as we would like because there are other things going on in life - and we can't always blog as often as we would like for the same reason.  It is difficult not to feel inadequate in the face of apparent super-productivity, and to worry that without having a constant virtual presence you are going to drop out of the loop, so Slow Blogging (at least my variation on the theme) is about declaring your intention to try not to compare yourself to other people, and to show a little support for fellow Slow Bloggers.

If you're a Slow Blogger, please visit and link up - the linky stays open for a week!


Wednesday, 13 November 2013

WIP Wednesday

Despite having a bit of a whinge about how hard I find the discipline of following a pattern, I'm getting very fond of this quilt in progress.


I now have all the triangles sewn together (there are some shameful cropped points, but I don't think anyone would really notice).


I'm going to customise it slightly by adding a border all round:  my daughter, who this is for, and I are just debating whether it should be pink, acqua or red.  (Or even the neutral, with a stripe of one of those...!)  What do you think?  Either way it's going to be a fun piece, I hope.  


I haven't decided how to quilt it but at the moment I think it would be nice to add to the colour madness with some perle hand stitching.

Other WIPS include some teeny-tiny crazy patchwork panels using the smallest of scraps left over from Liberty projects - some scraps are only a centimetre or so wide.  Because they are so small I have used a different crazy patchwork technique to the one I used for my Komebukuro bags - more about this soon.


I'm linking up with


WIP Wednesday at Freshly Pieced

Tuesday, 12 November 2013

How to make bunting - a faster and less fiddly method

Last year I made Christmas bunting. I used what is probably the usual method - ie laboriously cut loads of triangles, sew them together, turn inside out and then string together.


That's obviously the way to do it if you are using scraps but I realised that there is a way of sewing and cutting them which just helps to make the process a bit faster and less fiddly, if you have the luxury of yardage.

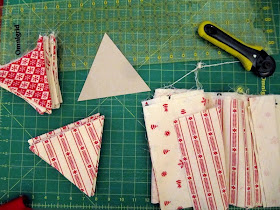
From a piece of cardboard cut a triangle template the size you want your flags to be including your seam allowances all round.   You can see how I have used the angle marks on my quilting ruler to cut an equilateral triangle.  Your triangle can be any kind you choose.


 Now cut two strips of your material as tall as your template.  (I chose a triangle size which meant I could cut four strips from a fat quarter.)   Obviously they can be wider than mine if you are using a full width of fabric - having a wider strip speeds up the process further.


Place down right sides together.  (Do be careful to make sure that directional fabrics are running the right way).


Now flipping your template as you go, mark off a row of triangles like this, using your favourite erasable pen - I love my Frixion pen which was in my Stitch Gathering goody bag - or even a pencil will do the trick.

Mark a triangle.
Flip and mark again
And again...
Do this until you have gone along the length of your fabric strips.


Don't cut your triangles out yet.  Instead, using your preferred seam allowance, you are going to sew seams on either side of your pencil lines. The quickest and easiest way is to zigzag up and down the triangles.  Go one way first - and if you sew as in the diagram below you can stop just before you reach the edge of the fabric, drop your needle, and pivot to turn without having to take the fabric out.


When you get to the end,  zigzag back the other way (shown in red)


You can now press your sewn strip to set all the seams in one go!

Now take your sewn strip, and cut along your pen marks in between your stitching - just like you do when making HSTs.


Voila! - a nice little pile of flags waiting to be turned inside out.


Snip the ends to reduce bulk and turn right side out.


I still never manage a very pointy point - if you have a good tip, please let me know.

Do you want to make even easier and faster bunting?  Just mark and sew your strips right sides out, and cut along the lines with pinking shears.

Either way, you're now ready to insert into your folded bias binding/cotton tape/ribbon and sew along. Leave a space between the flags, or butt them up together, whichever you prefer.


All those little offcuts from the ends of your strips can be cut down and made into mini bunting, which looks sweet wrapped round a Christmas tree.


I'm linking up to Fabric Tuesday!


Fresh Poppy Design